When a retaining wall begins to crack, lean or collapse, the issue quickly becomes more than a cosmetic concern. A failing wall can lead to soil movement, drainage problems, structural damage and serious safety risks across the property. At JBS Excavation & Retaining Walls, retaining wall replacement on the Mornington Peninsula is approached as more than a simple remove-and-rebuild project. Long-term performance depends on choosing a wall design that suits the site conditions, drainage requirements, surrounding loads and overall landscape layout.
This article explores how different retaining wall systems perform under varying conditions and why some walls deteriorate sooner than expected. It also explains how site preparation, safe removal, excavation, drainage and backfilling influence the strength and lifespan of the new wall. By understanding how each stage contributes to structural performance, it becomes easier to compare design options and choose a retaining wall solution that protects the property while complementing the surrounding environment.
A replacement retaining wall should not only solve the structural problem but also suit the property. The right design takes into account the style of the home, the lay of the land and how the outdoor space is used day to day. Getting this balance right improves the appearance of the property while helping the wall perform reliably over time.
The best design is chosen by balancing appearance with strength, drainage, access and long-term maintenance. Material selection, wall height, soil conditions and finishes all need to work together. A wall that looks good but does not suit the site will often create the same problems that caused the original wall to fail.
The first step is to consider the style of the home and garden. A contemporary home often suits clean lines, smooth finishes and simple geometry, such as concrete sleeper walls or honed block systems. Traditional homes may look better with textured stone, brick or timber, especially where a warmer or more natural finish suits the surrounding landscape.
The wall should feel integrated with existing features. Using colours that complement the house cladding, roof, paving or garden edging helps the wall sit comfortably within the property. For example, a rendered retaining wall can be finished to match the home’s exterior, while a natural stone wall can echo stonework around an entry, fireplace or garden feature.
Material choice affects appearance, durability, cost and maintenance. Each option suits different homes, site conditions and usage patterns.
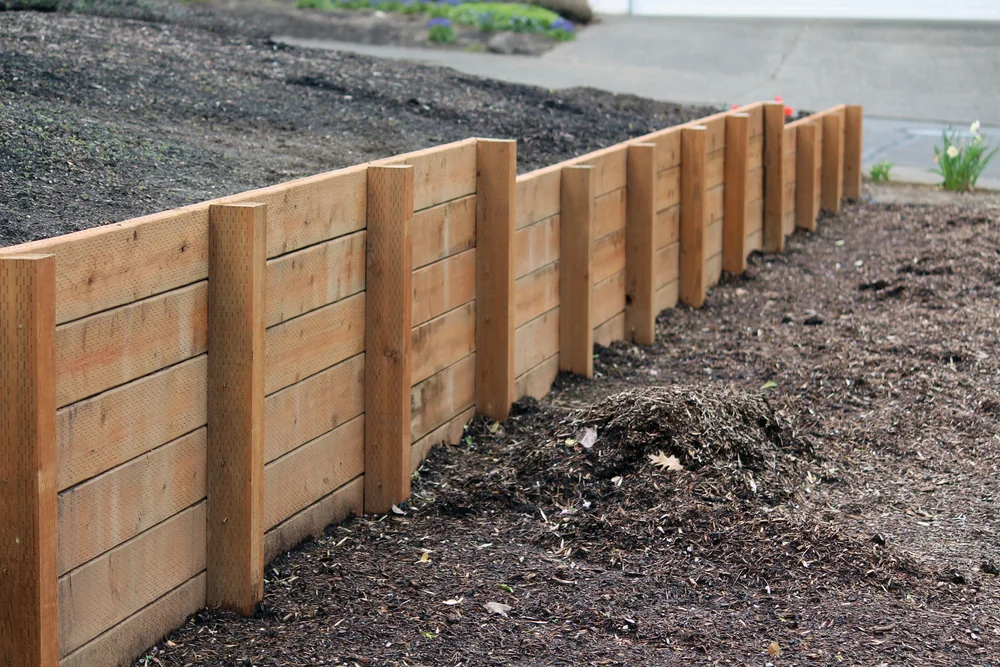
Concrete sleepers are strong, durable and well suited to modern homes. They are available in smooth, textured and timber-look finishes and usually suit projects where longevity and low maintenance are priorities.
Modular block systems use engineered units that lock together or are reinforced as part of the wall structure. They suit modern and transitional homes and can create tidy straight, stepped or curved walls.
Natural stone works well for character homes, rural properties and higher-end landscaping. It blends naturally into garden settings and ages well, but it often costs more and requires skilled installation.
Timber provides a warm and informal look, but it generally has a shorter lifespan than concrete, block or stone. It is more vulnerable to rot and termites, so it is usually better suited to lower walls or areas where appearance is the main priority.
Finish details also influence the final result. Capping units provide a neat edge and help shed water from the top of the wall. Sealers, stains or colour treatments can improve appearance and protect visible surfaces. Where the wall faces an outdoor living area, a higher-quality finish may be worthwhile, while rear boundaries or hidden areas can often use more practical and cost-effective options.
A suitable retaining wall design should support the way the space is used. If the wall borders a patio or entertaining area, wider capping may allow it to function as informal seating. In gardens, stepped or terraced walls can create usable planting areas for shrubs, groundcovers or herbs.
Safety also needs to guide design decisions. Taller walls may require engineering, council approval or a compliant barrier, especially near paths, driveways, play areas or changes in level. Lighting can also be integrated near steps or along the wall to improve visibility and safe movement at night.
Drainage and access should be planned early rather than added as an afterthought. The new wall design needs to allow for drainage outlets, maintenance access, stairs, gates and pathways where required. Planning these details before construction helps avoid awkward level changes and makes the wall feel like a natural part of the overall landscape.
Before a failing retaining wall is removed, the site needs to be assessed carefully. Demolition changes how soil is held in place, so the wrong approach can cause sudden movement, collapse or damage to nearby structures. A proper pre-demolition check helps identify what the wall is supporting, where the risks are and how the new wall should be designed.
This stage is also important because the visible wall may not reveal the full problem. Poor drainage, weak soil, hidden services or heavy loads near the wall can all contribute to failure. Identifying these issues before removal helps avoid costly changes once work has already started.
The first step is to identify exactly what the existing wall is holding back. This may include more than garden soil. Houses, garages, sheds, decks, driveways, fences, pools and large trees can all place additional load on or near a retaining wall.
If the wall supports foundations, slabs, footings or a driveway used by vehicles, its removal may need to be staged. Temporary support may also be required to stop the retained ground from moving while the damaged wall is taken out. Even a smaller wall can be structurally important if it sits close to a building or hardstand area.
These loads must be understood before the replacement design is finalised. A wall that only accounts for soil pressure may not be suitable if it also needs to support vehicle loads, nearby structures or sloping ground above it.
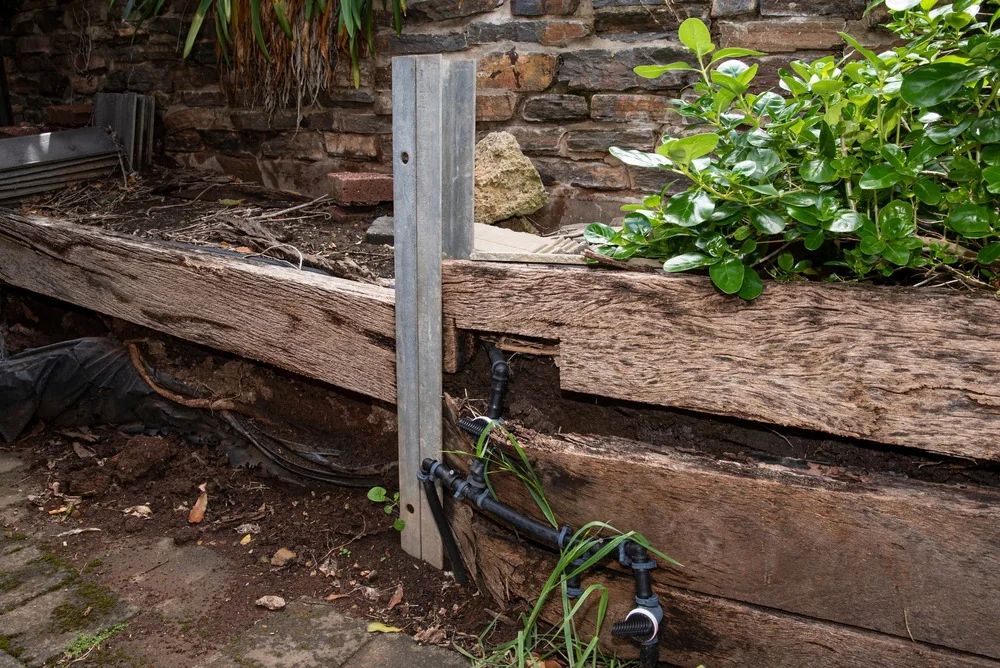
Underground services often run near retaining walls, especially along boundaries and around established homes. Stormwater pipes, sewer lines, septic connections, water pipes, gas lines, electrical conduits, irrigation systems and surface drains may all be close to or behind the wall.
Service plans, utility locating reports and on-site checks should be used together rather than relying on guesswork. Damaging a hidden pipe during removal can cause leaks, soil washout and unexpected instability. Stormwater outlets also need to be identified because poor water management is one of the most common reasons retaining walls fail.
Drainage conditions should be assessed before the wall comes out. Wet soil, blocked outlets, pooling water or staining on the wall face can all indicate that water has been building up behind the structure. These issues need to be corrected in the new design, not simply covered over with new materials.
The type and condition of the retained soil strongly influence how the wall should be removed and rebuilt. Clay, reactive soils, uncontrolled fill and waterlogged ground are more likely to slump once the wall face is removed. In some cases, the soil may need temporary support, staged excavation or replacement with more suitable compacted material.
Access also affects the way the project is managed. Narrow side paths, tight boundaries, steep blocks and overhead restrictions can determine what machinery can be used and how materials are moved in and out. Spoil removal, temporary stockpiles and safety barriers should be planned before work starts.
Resolving these details early helps the removal and replacement process run more safely and efficiently. It also reduces the risk of delays once the old wall has been opened up and the site conditions are exposed.
Removing a failing retaining wall needs to be controlled. A damaged wall may already be under pressure, and breaking it apart without a plan can suddenly release soil, water or debris. Safe removal protects nearby structures, manages earth pressure and prepares the area for the new retaining wall system.
This stage should follow a clear sequence. The site is made safe, the old wall is removed in sections, unstable soil is managed, and the foundation area is prepared for the new structure. Each step affects how well the replacement wall will perform.
Before demolition begins, the work area should be secured. Temporary fencing, barriers or warning signage may be needed to keep people away from the excavation, especially on residential properties where children, pets or visitors may be present.
Machinery access, material delivery and spoil removal also need to be planned. Clear access paths reduce the risk of damage to lawns, gardens, driveways and neighbouring properties. Stockpile areas should be positioned so excavated soil and demolished materials do not place extra pressure near the wall or create drainage problems.
Where the wall is close to buildings, driveways, fences or services, temporary support may be required before any major sections are removed. In some cases, it may be safer to reduce the soil load above the wall first so pressure on the failing structure is lowered before demolition begins.
Demolition should be controlled, not random. Timber sleepers, concrete blocks, stone or poured concrete elements should be removed in manageable sections so the retained soil is not suddenly released. As each section comes out, the soil behind the wall should be monitored for slumping, cracking or water movement.
If the soil starts to move, temporary support may be needed before work continues. This may involve benching the slope, using short-term shoring or removing soil in stages. The method depends on the height of the wall, the ground conditions and what sits above the retained area.
Materials should also be sorted as the wall is removed. Intact blocks or stone may sometimes be reused in landscaping, while rotten timber, corroded steel or broken concrete should be removed from site. Any exposed services, damaged pipes or unstable footings need to be addressed before the new wall is built.
Once the old wall has been removed, the site can be excavated to suit the new design. This often involves removing weak, wet or unsuitable soil and forming a stable base for the footing, sleeper posts or first course of blocks. The excavation needs to be level, consistent and wide enough for both the wall structure and drainage zone.
The exposed ground often reveals why the original wall failed. Wet patches, voids, soft clay, washed-out areas and poor backfill are common signs of drainage or compaction problems. These issues should be corrected before new materials are installed.
The subgrade is then compacted in layers using suitable equipment. Any soft spots should be fixed at this stage rather than hidden beneath the new wall. A compacted layer of crushed rock or road base may be used to create a stable platform, depending on the wall system and engineering requirements.
Correct drainage and backfill determine whether a new retaining wall lasts for decades or starts to lean, crack or move within a few seasons. Water pressure is one of the most common causes of retaining wall failure, so drainage needs to be treated as a structural part of the wall, not an optional extra.
A properly built wall uses the right materials behind it to move water away quickly and reduce pressure on the structure. The wall face may be the visible part, but the drainage and backfill system behind it often has the greatest influence on long-term performance.
Water trapped behind a retaining wall creates hydrostatic pressure. This pressure pushes against the wall every time the ground becomes saturated, especially after heavy rain. The problem is often worse in clay soils or on sites where stormwater runs towards the wall.
An effective design usually includes a perforated drainage pipe at the base of the wall. This pipe should be surrounded by clean drainage aggregate and connected to a suitable outlet, such as a stormwater system or daylight discharge point. It should sit low enough to collect water before pressure builds behind the retained area.
Weep holes may also be suitable for some masonry or concrete walls. However, they only work properly when there is free-draining material behind the wall and the openings remain clear. Without proper backfill and drainage, weep holes alone will not solve water pressure problems.
The soil placed directly behind the wall should not simply be the same material that was excavated from the site, especially if it is heavy clay or poorly draining fill. The drainage zone behind the wall should use free-draining granular material, such as crushed rock, blue metal, clean angular gravel or a suitable coarse drainage aggregate.
Granular backfill allows water to move down to the drain pipe instead of sitting against the wall. It also compacts more evenly than wet clay or loose fill, helping support the wall and reduce settlement.
A common detail is to place a drainage zone directly behind the wall, often at least 300 mm thick, depending on the wall type and design requirements. Native soil may be used further back where suitable, but it should be compacted in layers and shaped so surface water does not run back towards the wall.
Geotextile or filter fabric is often placed between the drainage aggregate and surrounding soil. This allows water to pass through while reducing the movement of fine particles into the drainage layer. Without this separation, silt can gradually clog the gravel and drainage pipe, reducing the system’s effectiveness.
The finished ground level above the wall is also important. The surface should fall away from the wall where possible so rainfall is directed towards lawns, garden beds, surface drains or other suitable outlets. Where driveways, patios or paved areas meet the top of the wall, a channel drain or surface drain may be needed to stop runoff entering the backfill zone.
A reliable retaining wall drainage system combines subsurface drainage, clean granular backfill, filter fabric and correct surface grading. When these elements work together, they reduce water pressure, limit erosion and help the new wall remain stable over the long term.
A replacement retaining wall should not repeat the same design mistakes as the old one. Before the new wall is built, the cause of failure needs to be understood. This may include poor drainage, inadequate footing depth, weak materials, unsuitable backfill, vehicle loads, tree root pressure or soil movement.
Once the cause is clear, the replacement wall can be designed to suit the actual site conditions rather than simply matching the old wall’s size and position. This is especially important where the original wall failed because it was underbuilt for the load it was carrying.
A well-planned replacement may involve a stronger material, deeper posts or footings, engineered reinforcement, improved drainage or a different wall layout altogether. In some cases, terracing the slope into multiple lower walls may perform better than rebuilding one tall wall in the same location. The right solution depends on the height, soil type, access, drainage paths and the way the surrounding space is used.
Replacing a failing retaining wall is not just a matter of installing new materials in the same position. The success of the project depends on understanding why the original wall failed, preparing the site correctly and building a new system that manages soil pressure, water movement and surrounding loads.
Careful planning during demolition, excavation, base preparation, drainage and backfilling helps prevent recurring movement, cracking and water pressure issues. When each stage is handled properly, a replacement retaining wall can provide long-term structural support while improving the appearance, safety and usability of the property.